Wednesday, 6 November 2013

strength training for runners


Sarah Robertson came to me a few years ago with dilemma and a challenge, having only been a 5k runner for a number of years, the initial consultation went along these lines:

S-“I haven’t trained in 8 months owing to a double ITB problem as in both legs have been written off by the physio”
Me- “So you need a rehab programme to get you on the mend before you start training for your 5k events”
S- “kinda, I want to run a marathon”
B- “okay no problem when are you looking at”
S- “That’s the dilemma”
B-“Why”?
S-“It’s the Jersey marathon and it is in six weeks”
B- “oh”

So based on that we discussed the challenge and despite trying to persuade her to wait a while, we started the programme.
Sarah posted 4hours 45 minutes for her first attempt which given the injury and time period for training was a great effort.

From there a relationship between Coach and athlete grew, with Sarah coming up with more little goals in between her main goals. Remembering her only goal was to do 1 marathon, in her first year we completed three marathons and a number of 5 and 10k events with a half marathon for good measure.

Year 2 was the laughable one “I will just concentrate on half marathons this year”, that lasted all of two minutes when I heard “Will you train me for an ultra”? (An ultra marathon being any distance beyond marathon distance.)

The good thing was Sarah trusted me with regard to her training and despite many of her peers and fellow runners telling her it was all wrong, “runners don’t train like that” we kept going.

Sarah was introduced to Olympic lifting, kettlebells, sledges, trx, tyres, weight vests, hypoxic training, TUF (technique under fatigue) and so much more. Her running style and programme completely changed introducing hill reps, sprints, working the curve in reverse doing speed power then endurance. Most of all she was asked for constant feedback which was something new to her!

Sarah is now part of our athlete performance programme and has kindly given a testimonial which can be read below—


Running a marathon was an ultimate goal. It scared the hell out of me but I wanted to try it just once. Sure, I could have downloaded a training programme from the internet but I knew I needed a bit more of a ‘push’ – and I had a few wee injury niggles to resolve. I needed some help with this challenge.

Having trained previously as part of a group instructed by Brian, I knew he had the mix of knowledge and motivational skills that would get me through. And he did. There was only one ‘problem’.

He made this and other challenges seem achievable. It seemed logical after a few marathons to look to other challenges and I wondered how far I could go, could I complete an ultra marathon? After my first 53 mile race, we found out – yes, I could. My goals change and evolve because I gain physical strength and mental confidence from training with Brian.

We have now completed two competitive years and I have had no injuries to hamper my training. Yes, training can be hard work sometimes but he also makes it fun too and the results are worth it. Brian makes me realise I can achieve more than I ever thought I could.

Her strength exercises consisted of the following basics, with a variety of others at different stages of the programme.

Clean and Press


Reason
The exercise involves strength and speed and works the deltoids, trapezius, quadriceps, hamstrings, glutes and triceps.

Deadlift


Another strength and speed exercise targeting the lower back trapezius, quads, hamstrings and glutes

Squats

Picture to follow

The squats are a great strength exercise and target the quads, hamstrings, hips and lower back

Sissy lunges


This exercise - a variety of a standard lunge - is not vastly used but is great for strengthening the vastus medialis muscle which helps to align and track the kneecap properly. If you strengthen this muscle it can help prevent runners knee/knee pain.

Charlies Angels

A variety of the Gun drill exercise


Plyometric exercise aids running economy and all runners should incorporate single leg exercises into their programme, the additional benefit of this type of jumping lunge is the rotation of the torso which helps promote stability in the abdominal and lower back areas.

Kettlebell swing


The kettlebell swing is both a strength and power exercise. The swing strengthens the back, shoulders, torso and posterior kinetic chain, It also promotes functionality of the body as in it works as one unit rather than isolating the muscle groups.

Kettlebell single leg deadlift


Targets the posterior chain and torso , inclusive of hamstring, glutes and erector spinae which help with posture , which are also involved in running, and jumping, they are responsible for generating hip and back extension power. Aside from the performance and posture promotion, keeping these muscles in good shape is also important for injury prevention.

Since the initial programme Sarah has competed in over 13 ultra marathons (ranging in distance from 33 miles to 95 miles), marathons, duathlons, x country events and is one of only five women in Scotland to have completed five ultra races in the 2013 Scottish Ultra Marathon Series.

What will next season bring?

Friday, 5 July 2013

Strength and conditioning for triathlon part two


Strength and conditioning for triathlon part two

in the last issue we looked at two forms of squats, this issue we will look at two more types of leg exercise, namely the step up and bulgarian split squats. Both exercises re great single leg exercises for developing strentgh.

The Step Up
Ensure that the box used for this exercise is

> 12-18" minimum off the floor
> or at least high enough to create a right angle on the knee bend non
> slip surface on the top wide enough for the lifters foot to be placed
> fully on top

> Ensure that the bar is approximately armpit height, move towards the bar and place the bar in the low or high position across the back, hips and feet should be directly below the bar.

> a pronated grip approximately more than shoulder width should be adopted.
> elbows should be raised to form a shelf to be created across the back
> so the bar does not slip

> step up onto the box from a standing position with the lead leg, ensure the trail leg is in contact with the floor.

> do not push off the trail leg, ensure that your torso is square and erect throughout the exercise.

> pause at the top of the exercise and

> then shift your weight back to the trail leg before returning the lead leg back to the start position.


*ensure that a spotter is used throughout the exercise

Bulgarian split squats

> grasp the bar in a pronated grip and the bar is in the low or high position across the back, grip should be just outside shoulder width apart.

> stand in front of a bench or box and place the rear foot on the bench

> Ensure that your weight is placed evenly throughout the lead foot with
> the knee in line with your toes

>lower to a point ensuring the the thigh of the lead leg is parallel or
>almost parallel to the floor

> Ensure that the torso remains erect and square to avoid bending over

> the knee should not lock out at the top of the movement.


both of these exercises are great for single leg strength and should be practiced regularly throughout your strength and conditioning programme.


Friday, 17 May 2013

Strength and conditioning for triathlon 1


Exercise selection

When it comes to strength and conditioning for triathlon it is simple to fall into the old body building programmes which is how most sports fell into developing their own programmes and protocols

The demands of the sport are vast and too time consuming to go into each particular bio mechanical demand, stress and requirement of each muscle group, however once you understand the basic requirements of the muscles, exercise prescription and selection should be easy for you.

Firstly we will start from the ground up and look at exercises to increase overall strength in each of the disciplines.
In this article we will look at two types of squat although all squats have unique coaching points to each of them, the basic fundamentals in general are the same

> each squat movement should be initiated with the hips sitting backwards (imagine sitting in a chair) your knees will bend automatically, your back should be kept tight with the abdominals in a braced position, the back must not be allowed to round off at any point, if your lower back rounds a few factors need to be looked at the first and main two are technique and the weight lifted.

> knees must be stable (the knee is a stabilising joint (so allow it to do its job) the knees should not be falling inwards they should follow the line of your toes.

> the descent must be controlled with a slight pause or hold on completion of the downward movement, this allows for a more powerful drive after the initial inertia has stopped. Never bounce out of the squat!

> Your weight must be evenly distributed throughout the exercise your feet should be about shoulder width apart

Exercise 1 Front Squat

The front squat is probably the second least used squat after the overhead owing to a greater degree of difficulty compared with the back squat, the front squat also allows for a bit of variety in your session.

As stated this squat is technical and the biggest obstacle for many people is holding the bar in the correct position.
The bar can be held in the crossed arm position (fig 1) or the clean position (fig 2)

Cross arm position


Flex the elbows and cross your forearms in front of your chest Position the bar evenly on top of the anterior deltoid without use of your hands Place your hands on top of the bar using the fingers (hand open palm down) to keep it in position.
Move the arms upwards so they are parallel to the floor.

Clean position


many struggle with this position owing to a combination of lat and wrist tightness.

Grab the bar with an even closed pronated grip ensuring the hands are just over shoulder width apart Rotate the bar so it rests on the anterior deltoids or clavicles, the hands should be just out with the shoulders with the back of the hands resting on the deltoid or clavicle.

We advocate position 2 as this will be of greater assistance later in the programmes when completing the Clean and Press

Exercise 2


Back Squat
The most commonly used squat and one that probably promotes more incorrect technique than correct technique, mainly owing to the use of a Sissy pad.

Sissy pads promote in correct technique by allowing users to rest the bar using the pad on their shoulders thus promoting incorrect technique by not allowing the user to retract the shoulders making the chest bigger and allowing the back to naturally produce a bed of muscle for the bar to sit on comfortably. if the pad is used it can promote bad posture issues and a loose upper back.

The back squat has two placement positions which is personal to the user dependant on any factors however both are correct and both can be used. All users should regularly attempt to to use both positions in their programme.

Low back position


Grasp the bar and place it across the shoulders in the middle of the trapezius and across the posterior deltoids ensuring the bar is in an even position ensure the grip is closed and pronated and outside shoulder width apart

High Back position


Grasp the bar and place it above the posterior deltoids just below the neck closed pronated grip with hands outside shoulder width apart.

NB for both of the positions the elbows should be raised to promote a shelf with the upper back and shoulders this prevents the bar from slipping.


Strength and conditioning for swimmers 1


Prehabilitation exercise for the shoulders

Prehab is sometimes scoffed at by athletes of various sports, however it is becoming a major and integral part of many an athletes strength programme.

Physiotherapists and sports masseurs have been using pre habilitation to ensure that athletes stay at the top of their game and obviously to minimise the risk of injury and then having to enforce rehabilitation as part of the plan.

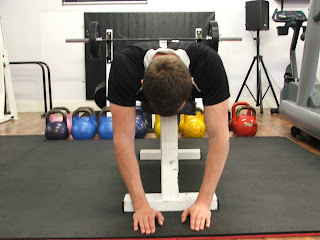
One of the best shoulder rehab exercises for swimmers or even upper body athletes is shapes, quite simply the shoulder's make the relevant alphabetical shape during a four movement functional movement pattern. This session can be used as a warm up, part of a conditioning set or on a stretching routine where functional movement patterns form part of the stretching. The following movement pattern may help to improve fine motor skills used during swimming.

Start position - lying face down on a bench or step, ensure your chest down to the top of your knee is supported by he bench, hands hanging down to the front of the bench shoulders relaxed (fig 1)


Execute the following movement pattern ensuring that

Start at the start position for each phase All movement is controlled Perfect technique is conducted throughout the routine for each movement pattern If fatigue sets in do fewer reps

Y (fig 2)


T (fig 3)


M (fig 4)


L (fig 5)


Coaching points

Don't cheat by throwing the arms out
Or moving the chest off the bench
Shrugging the shoulders up towards the ears


Exercise prescription
Start with body weight and progress to light dumb bells no more than 2kg
For best results ensure you start the movement patterns at a different point each time you conduct the sequence, this ensure stat the muscles fatigues at different points.
Vary the sequence as well as in
First time execute one of each movement until required reps sets complete
Next time do only the t's first then the y's and so on.
Also repeat the pattern in reverse.

Variation
Try the movement patterns whilst seated on the edge of a bench ensure the spine is upright and stable.

Watch out for more conditioning drills from T.O.D Coaching.


Thursday, 9 May 2013

Aberfeldy cycle update


What goes up, must come down!

My main target for this year is the Aberfeldy Middle Distance Triathlon which consists of 1900m swim in Loch Tay, 56 miles cycle ride and a half marathon (13.1miles) to round it off. All my training this year is aimed at getting me round this course so when I realised the cycle route involved a climb over the saddle of Schiehallion and back again I thought it would be good to check out the bike ride ahead of time.


Last weekend I headed up to Kenmore, along with my very understanding and supportive husband, Jerry. Since it had been my birthday the week before we went up for the full weekend to stay at Kenmore Hotel as a treat, and had a very enjoyable Friday evening. On Saturday we took a look at where the swim goes from but any thoughts of a trial swim were very quickly dispelled by both the water temperature and the howling wind whipping across Loch Tay. I would certainly not go into water like that without a very strong swimmer by my side, at the very least.


We then decided to drive the route so I would know where I was going on Sunday, when Ian from work was coming up to cycle the route with me. Jerry would be our support crew, meeting us in a couple of places with require refreshments and moral support.
On driving out of Kenmore it was pretty quickly apparent that the hill had not been exaggerated, a 1000ft climb in one long drag which seemed to go on forever in the car. Once at the Schiehallion turning the road then undulates, before dropping down the other side into Kinloch Rannoch. The route goes around the north side of the loch back along the south side and then back over the hill to Aberfeldy.

On the return drive it was clear that although the climb is not as high as the first one it is steeper. We saw plenty of cyclists all along the route, as it was the Etape the next weekend we may have seen some people giving it a last minute trial.
I finished the drive a bit worried for the next day, but I had always planned to do it to give myself an idea of the route, compare the hills to ones I was training on and get a feel for how far off ready I was and not worry about how fast I did it. My goal for the race is to cycle it in less than 4 hours, and for the recce I was expecting to complete the route in 5-6 hours.


Sunday dawned reasonably bright with a stiff wind, not as bad as the previous day but still pretty windy. Also the forecast was for rain from midday. Ian arrived just after nine and we headed out straight away. There is a three mile flat road before the hill starts so the legs get some warm up and then the climb starts. I knew it would be quite tough so decided to just pace myself and make sure I could do it in one go. Ian very kindly stayed with me to keep me going and by just thinking about keeping the rhythm and drawing on my training I made it to the top and turned onto the saddle still feeling pretty strong.

The saddle was good after the hill but the wind was swirling about and after the fast drop off the top we were into a head wind all the way into Kinloch Rannoch. We had planned to meet Jerry at a parking spot at the head of Loch Rannoch, I thought it would take us at least 90 mins to get there. In the end we did the 16 miles in 1 hr 13mins so were too early!

We waited ten minutes but the spot was a cold one so after a protein flapjack we headed out. We had to stop after ten minutes when Jerry called to make sure we were OK, and on getting going again I was struggling to get my second cleat to connect. While still trying to do this I lost attention on the road, ran off the side into a huge rut and next thing I knew I was in the middle of the road. I hate falling off, I always feel so stupid. Since nothing seemed badly damaged, my right elbow and hip were just sore I got back on and kept going.

The headwind all along Loch Rannoch was very tough and seemed to go on forever. I was desperate for the turning at the bottom of the loch. It came at last and then we turned and had the wind at our backs, but the south side is more sheltered so there did not seem to be as much benefit as we had difficulty. The route around the loch is mainly undulating with a couple of tricky hills but generally OK. We met Jerry at a car park and stopped for lunch.

It was a relief to get out of the wind and sit in the car for a few minutes. When a few spots of rain started we decided it was time to get going on the last leg. I was very aware that we had a steep hill ahead of us and tried not to worry about it too much. The first few miles were along the loch side and were undulating again, then there was a flat few miles with a nice tailwind before the climb began. It is not as high as the one on the way out at 600 feet but it is very steep and I had to really pace myself to keep going.

The hill does have a respite about half way up where there is a flattish bit then it starts again, with a pretty nasty hairpin and just an unrelenting climb. Again, I managed it without having to stop and the top was definitely a relief. At this point though the rain came in with a vengeance and that swirly wind became a real headwind. The whole ride along the saddle was much harder than the way out, and seemed to go on for ages. I was very relieved to see the T junction at the top of the hill and, even better, the rain stopped at the same time.


The ride down the hill was fabulous, but seemed to be very long. I was very impressed with myself that I had been able to cycle up it in one go! Also, a van behind us decided not to bother passing us as we were making such a good pace. I only slowed for a couple of the tightest bends. The last three miles was a flat ride back to Kenmore (we decided this was better than going to Aberfeldy and needing to come back along the main road and only takes off 2 miles) but the headwind again made this harder than I wanted. It was great to see the Kenmore Hotel come into view!


Overall we took us 4hrs 30mins, actual riding time was 3hrs 41mins and I felt pretty good at the end. The route is tough but I did it in much faster time than I had thought I would, both overall time and actual riding time so I now have loads of confidence that my training is going well and I will be able to do the ride on the day. The idea of checking out the route was a great one, so I am really happy we did it. Roll on August and huge thanks to Ian for keeping with me!!

Friday, 3 May 2013

Battle Ropes


Battle Ropes for triathletes
I know sounds weird why would an endurance athlete who spends most of their time swimming, biking and running even consider a new approach.
I shall tell thee!
Firstly what are battling ropes?
This type of training is not new but has seen a new introduction and thought process over the past ten years with it re starting in America.

The ropes come in various sizes, predominantly 25mm and 45mm with lengths of 5m, 10m and 25m and weigh 7.5 and 20 kg.
Benefits of battle rope training include
The benefits of training with the ropes is that it is just isn’t a conditioning tool, this piece of equipment will work every muscle you have including some you didn’t know about.
One of the big benefits is the development or enhancement of power endurance It is essentially the ability to apply maximal force, at maximal speed, for a maximal amount of time. This requires a huge demand on the energy systems in the body, burning a huge amount of calories and improving strength and fitness.

 Power endurance – the ropes increase all over power by working the whole body as a unit

 Low impact Minimal stress is placed on the joints, with all the force applied through the muscular system.

 Athletic Performance. Trains the neuromuscular system to apply force that begins at the core and extends through the extremities (both arms and legs) - a must for improving performance.

 Calorie Burner. Burns just as many calories as sprinting, high-intensity interval training and heavy resistance training

 Killer core workout. Works the core not just the abs, remember the core goes from hip to shoulder diagonally across the body front and back and down to your knees front and back thus it ensures that by both applying power from the core and stabilizing and bracing spinal movement.

 Builds functional strength. The body is worked as an integrated unit rather than in isolation.

 Psychological training. This will push your boundaries because it burns as soon as you start and you need to push through the burning to reap the benefits.

 Easy to use from novice to elite levels and once you can’t hold them anymore just drop and go!


Using the ropes
Ensure the rope is wrapped around an anchor point, and you hold it at the very end of the rope's length. Then using a whipping or circular motion with your arms, you create what's called a “wave”, which requires a huge metabolic demand to maintain in the rope.
There are four basic exercises which are commonly used and are standardized throughout the world.

The Wave- create continuous waves as a double or alternate wave

The Pull- by copying the action of a skier you pull the rope towards and the side of you, again to one side or alternate.

The Slam – basically like a wave but slam the rope downwards to the floor every time you lift.

Jumping jack- the same as a bodyweight jumping jack but use the ropes.

These exercises are great for athletes of all sports; however we have developed a few to further the development and power of triathletes especially for the swim.

Corkscrews- similar to a wave but ensure the rope rotates in a continuous manner in a circular motion, both can be done as one rope, singles or alternates and ensure you go the opposite direction.

Hi-lo’s- you need a bosu for this as well or a mat, Slam in the standing position then drop on to the bosu and conduct another slam.
Front crawl- lie on a bench face down with the ropes in each hand and execute alternate waves with straight arms and kick your legs at the same time as if swimming front crawl.

Back crawl- lie on a bench on your back with the ropes in each hand and start alternating the ropes in a wave like motion kicking your legs.

Butterfly- lie on a bench face down and execute corkscrew motions with the rope change direction each set. Legs moving in a dolphin kick motion.

The best use for the above is a metabolic session so we employ a 30 second work rate followed by 15 seconds rest, repeat for five minutes rest 1 minute and move to the next exercise or repeat the same one.

Get them ropes moving!

Kettlebells for triathletes part 2


Hope fully by now you will have read and digested some of part 1 and why kettlebell training should be an integral part of your strength and conditioning for endurance events.
In part 2 we will cover selection of a kettlebell and weight, and cover further exercises which will aid you in your strength training.

Kettlebell selection
When choosing a KB it comes down to an individual’s choice and much has been written covering this subject.
The KB should fit comfortably in the hand and easy to grip, with the handle being smooth, the horns rounded not angular and the distance from the bell to the handle around 6cm’s.
I personally use KB’s provided by optimal life fitness or Jordan’s as these fit the above criteria and are averagely priced. Whether you want cast iron, solid, rubber, vinyl dipped is entirely your choice.
Weight wise it is widely recognised that female’s starting out should use between an 8kg – 12kg KB and med 16kg-20kg KB. Again this is down to experience with KB’s and current fitness levels.

The main point to remember is that the KB will work your body as an entire unit and not isolate muscle groups (unless used for this purpose) so starting with the above suggested weights until the technique is mastered is sound advice. Please don’t purchase any of the so called fitness belles which range from about 2.5kg to 7kg as you will quickly find that these are of no use to you in any capacity apart from a doorstop.
Conventional exercises
These can be used as part of your training and are widely used by athletes with Kb’s.

The basic’s are
Tricep extension
Bicep curl
One arm row
And are utilised the same way as a normal dumbbell, beware though that the KB does hang as dead weight and is harder to control compared to a balanced Dumbbell. We will add some more isolation exercises later.

The swing
Once you have mastered the basic Kb techniques, you can look to progress onto other exercises; one thing that I as a coach and KB user advocate is the turn method of swinging.
Many people use the standard version (American) which places a lot of pressure onto the front deltoid and users/athletes tend to try and lift rather than swing the KB.
The thumb method basically is turning your thumb to the rear (thumb to bum) as the Kb swings through your legs. This method allows for better control and utilises the rotator cuff muscles, triceps and deltoids to be incorporated more and ensures that the athlete “snaps out” from the hips utilising the PKC (posterior kinetic chain) and ensures the bell swings rather than being lifted.
Most Kb movements start from the swing and can be completed using one or two Kb’s below is some of the basic exercises.

Fundamentals.
1. Double handed swing
2. Single hand swing
3. Alternate hand swing
4. The clean (rack)
5. The High Pull
6. The swing snatch
7. Military Press
8. See Saws.
9. Front Squat
10. Conventional dead lift

These exercises must be practiced and perfected before moving onto additional exercises, I have tried to include what I feel are the better versions for triathletes, and have tried many and varied versions with Team T.O.D over the past year.

Progression
1. Arrowhead swing (double swing to overheard)
2. Saxon side bends
3. Diagonal snatch
4. Reaching Lunge (front, side, rear)
5. Stair Squat
6. One arm Scot’s press (squat press)
7. Windmill
8. Turkish get up (lunge style)
9. Split jerk
10. Push Press
The above list is not exhaustive either are the different types or amounts of KB exercises out there,
However the above and the exercises listed in this blog are as I said what I as a coach and triathletes from Team T.O.D who have used the KB’s as an integral part of there training consider to be the better ones.
If there are any out there we have missed or are considered to be better than those listed please let me know and I will try them out.
Conventional exercises have briefly been covered but we will add some more to the list which can be beneficial to your strength programme and should e incorporate as part of it and not used as stand alone exercises.

1. Bench press
2. Calf raise
3. Thumbs up press up
4. The Fly
5. Straight arm pull over
6. Bent arm pull over
7. Front arm raise
8. Jowett tricep kickback
9. Side press
10. Bent press

When it comes down to sets and reps for any of the exercises listed, this again is down to specifics and what the outcome of your session is to be.
Predominantly we as a team tended to opt for between 12-15 reps of a set, and also conducted timed circuits of 5 minutes with 30 seconds of an exercise and fifteen seconds rest, completing as many reps as possible in that time for each exercise, this also lends the body to metabolic conditioning which is a another subject in its entirety.

Upping the ante!!


Upping the ante!!

If I thought the Jan training plan was hard that was nothing compared to February’s! When I got the plan I realised the swim was really getting long now – 3km each time, and Brian had included a 30mile bike ride each week and one of the ten mile runs had a wee surprise – hill reps up Ratho Hill! Still, I know it is what I need to do to be ready for the half Ironman distance.
The first week went really well, did it all and managed it, even if it was not pretty at times. The first time I ran up Ratho Hill I thought there was no way I would do this four times, but I gritted my teeth, dug in and managed it, although the final cool down mile was a grind. The swim sets also took a bit of getting used to, but they now seem like a normal swim, it is amazing what you can get used to.
Although I have been training hard and done almost everything on the plan I have struggled with a few things. I have been travelling for work every week in Feb so this made things a bit tricky, and a lot of sessions were done in gyms rather than outside. Also, I was fighting off a cold until ten days ago when I really went down with it so that put a whole weekend out for training. At least it coincided with snow so I did not lose out twice! The hardest bit has been to do the 30mile bike ride. One was done in the gym – I have now found something more boring than treadmill running! Last weekend I was able to get outside on the bike and it was fantastic to be out. I am so looking forward to the better weather and lighter nights.
I have a bit more travel coming up but am then hoping that things will become a little more reasonable and I can get my life back.
Most weeks have been 10-11 hours training and it has been tough to squeeze it in, but then again when travelling there is little else to do in the evenings so a gym session can be a good way to fill time and stop myself eating too much and spending the evening in the bar!
For interest, my distances to date are:

Jan: Ran 82.5 miles; Cycled 160 miles; Swam 8.9 miles
Feb: Ran 75 miles; Cycled 101 miles; Swam 13.6 miles

Roll on March!!

Friday, 8 February 2013

A summary of January’s training:


One month down:

Now it is the end of January, I can look back on the first month of training for the half ironman. When I first got my training plan from Brian my first tought was – I haven’t run ten miles for ages!! The plan consisted of 2 x 10 mile runs (1 fartlek), 2 x 20 mile bikes (1 fartlek), 2 x 2km swims and 2 strength and conditioning (S&C) session, each week. So I saw it as a challenge and knuckled down. The runs started at a very steady pace as I really wanted to be sure that I could do the ten miles. Most of the bike sets have been done either in the gym or in the garage on the turbo trainer due to weather / darkness.


The swim sets were within my capability for distance, and included some good race speed sets, and the S&C work was good to do as it had been a bit neglected over the winter.


So how has it gone? Well, with a lot of travelling requirements from work this has made the time pressures interesting. I do as much training as I can in the week, but still need to get in a run, a bike and an S&C at the weekends. But to date I have done almost everything on the program. I missed a swim set when there was no available pool anywhere close to the hotel I was in one week. I also cut a run short last week when the ‘gym area’ in the hotel (otherwise known as a store room in the basement) was hotter than the sauna area, and I only managed a third of the distance I should have done. Having the ton up sessions to do for my S&C is great as this can be done anywhere, even if the hotel has no gym.

Also the land training sessions on a Sunday morning at the gym are great to keep the S&C interesting and fun. I have managed to get outside on my bike for one ride this week and am really hoping I can do this more often in the next few weeks. It is so much better that the turbo trainer. Overall, I have seen completing the sessions each week as a challenge and have managed it most of the time. By the end of the month though I am starting to feel a bit tired – not sure if it is the travelling or the training, or both!!

So, bring on the February program – let’s see how I go with that

Wednesday, 16 January 2013

Going for Gold

Going longer!!
So it is now three years since my first ever triathlon – Stirling Sprint in June 2010, and I have come a really long way since then. Now I am contemplating going further still.
Since June 2010 I have competed in numerous pool based sprint events, two pool based standard events and my first open water sprint at Lochore Meadows last year. I have also worked really hard on my swimming both in the pool and open water, so it is time for something new. In 2013 I will be entering, and hopefully completing, a middle distance event, equivalent to a half Ironman distance. This consists of 1.9km swim, 90km bike and 21km run. A significant increase on my current events, and it is also my stepping stone to my goal in 2014 – the UK Ironman in Bolton.

I will be keeping a blog on my training through the year up to my planned event of Aberfeldy middle distance in August, and maybe afterwards as well to track my recovery. New middle distance triathlon training plan Brian has supplied a training plan in January to get me started on my goal of the middle distance triathlon in Aberfeldy in August and it is certainly a challenge. I was a bit shocked to realise the run sets were 10 miles each, it is years since I have run that far, but then was almost as shocked when I ran it without stopping first time out. I have now done three of these, two steady runs and one fartlek session, and I know I have the strength for the distance and it is certainly feeling easier each time. A case of mind over matter I think. The swim sets are within my distance and capability but are making me swim a bit faster in some sets which I need. Am also finding that I am making progress here as well which helps me to keep feeling positive.

My big challenge will be once I get back into the open water later in the year. For some reason I always find it hard to keep swimming in open water, even when I don’t feel tired I seem to stop so this is something I have to work on. The hardest to do at present is the bike as it is hard to get outside when it is not dark or icy. The turbo trainer is getting some hard work as a consequence. I am really looking forward to the lighter evenings so I can get outside on the bike much more regularly.
Strength and conditioning training is supplied by land training sessions plus ton up sessions. The workouts are not as hard as the pre-fatigues!! My upper body strength is still nothing like as good as my lower body so there is work to do.

So good start to the training, and now I just need to work out how to fit it in around work, especially when I am travelling.

Denise

The Edinburgh Women's Novice Triathlon 2012 race report

It all started over a cup of coffee and cake after 'Team Tod' had finished taking part in the 2011 Men's Health Survival of the Fittest race. I heard myself say out loud, "I'd quite like to train for a triathlon". "Come along to the training then" they said. That was it, the idea was out there and I started to look at triathlon dates for 2012. When the gym posted a link for the Edinburgh Women's Novice Triathlon I had a look at the website.
It was being held on the 1st July at Dalkeith school campus and comprised a 400m swim, 10km bike ride and 5km run and as the title suggested it was for women who had never done a triathlon before. I decided that was the one for me. I had to submit a swim time when registering my details so I put down a time I thought I could manage; 18 mins.
The last time I had swam competitively was when I was 11, two lengths breaststroke. My first couple of lengths front crawl as a warm up were, painful and there were weeks when I thought I had never swam before. However by the time the pool was due to shut for the summer I was able to swim front stroke without having to stop after a length and a half. The coughing and spluttering had gone.

Winter bike sessions at the gym entailed following an hour long DVD cyling through the Canadian rockies. One Saturday I was introduced to a brick session, eg after an hour cycling you jump off your bike and run outside. I watched as the rest of them ran off. My brain and legs didn't seem to work in sync yet it seemed. Outdoor cycling took over once the weather improved and if the team went out together we usually went for a 10 -12 mile round trip, do-able in about an hour.

I started to cycle to and from the weekly pool sessions, up and down to the gym and back and forth to work. Kept thinking if only it was a swim and a bike ride I'd be fine. The third element of a 5km was filling me with dread. Not least because, one Saturday morning I had gone to the Edinburgh Park Run at Cramond. They run a free timed 5k run every Saturday and I was as they say, blowing out my backside by the time I'd finished. Not good. Unfortunately, not long after that I developed an injury to my calf which kind of put paid to doing much to improve my running. I think it was about then I thought I'm not going to go through with this, what's the point if I can't run. However I was still able to swim and cycle and had kept up a fair bit of strength and conditioning training at the gym. So, after a fair bit of encouragement to go for it. I did.

Registration at Dalkeith was between 1000-1130 and the event was due to start at 1200. I arrived about 1045, collected my race nos, and safety pins. Next I got my nos marked on my leg and arm. Then I went back to my car to unload my bike and take the kit I would be wearing on the bike and run, to the transition area. We had had a coached transition session at the gym a couple of weeks before so the transition area wasn't too bewildering. The space was limited though and I was quite aware of not taking up too much space. The pre-race briefing was at 1130 at the registration area and I met a couple of women there who looked about the same age as me. We all concluded we were all a bit crazy to be taking part but what the heck. Half an hour later and I'm in the water with my orange swim cap on in a swim lane with 3 other women waiting to start my 16 lengths. Thirteen minutes later and I'm hauling myself out and trying to run barefoot, lightly over the playground to the back of the school to my bike. I hadn't bothered with a triathlon suit so it was on with a t-shirt, shorts, socks, trainers and a bike helmet.

After unhooking my bike I ran to the start line, jumped on and cycled out the school. The 10k cycle started with a hill and I do mean A HILL. Some of the women were walking up it, pushing their bikes. I did think about it, but decided all those squats at land training would not go to waste and just went for it. (Wonder if the photographer at the top caught my expletive).

Thought it would be easy after that but, unfortunately the wind was in front most of the way and the worst part for me was still to come. When I got back to the school and hooked up my bike and started on the run I just kept saying if I can keep going till I'm out of sight I'll be fine. I don't know how many times I stopped running and walked but I wasn't the only one. Everyone who did, got lots of encouragement to keep going from the other runners. My calf was seriously seizing up and when it got to the 3k mark there was no point in going back so I ended up walking/jogging to the finish line. It felt good to have finished but I was disappointed I hadn't been able to run all the way.

Anyway with a medal round my neck, banana and water bottle in hand, I went to get showerd and changed and headed back to the canteen. Women were coming in in dribs and drabs and I got chatting to a lady who only trained for this event every year (not a novice event then). Another lady had come through from Helensburgh because she loved running and because her husband was a triathlete. There were women of all ages, sizes and levels of fitness coming back in. I'm glad I'd been in early cos the buffet was disappearing fast! I have to say I loved training for the event.

My swimming improved and I learned how to breath properly. I've re-discovered the joy of cycling and I can see much room for improvement in my running ability. I can't compare this event with any other one but because I went along on my own and it was a women's only event it wasn't too daunting. And, it was really well organised. Oh, and the buffet was superb! Lorraine

Wednesday, 9 January 2013

Critical swim speed

When purchasing, downloading or borrowing a swimming programme, or when you attend a coached lane at the local pool, have you ever wondered what all the jargon means? Ever wondered how the coaches and swimmers alike all know how to pace themselves, and at what intensity they ought to train? Apart from endless miles in the pool and one to three hours per week land training, how do they achieve split times, race pace, swim rest ratios and how do they make it look so easy? Brian Fernie explains:

Swimming in this respect is not much different from many sports. Whether you are recreational, a club triathlete or an elite swimmer, it all boils down to the same things when you are swimming. Stroke technique Stroke count Aerobic conditioning Anaerobic endurance Land training Mileage in the pool Type of stroke Many of us have tried, and died, trying to swim 400m straight away. Many of us have wondered what 'onset blood lactic tolerance' and 'swim rest' mean. Fear not, in this article we will look at the critical swim speed test, who can do it, and what you need to do it (apart from big lungs).

The test was devised by E Ginn in 1993 and is used by coaches and swimmers alike to test aerobic fitness that can be maintained. From the test results, Ginne concluded that training times could be calculated and set for swimmers using his unique/specific calculations. This means that swimmers can train just below 'race pace' or at 'lactate threshold', to give it it's other name.

Who can do it? Anyone who wishes to improve their aerobic swimming capacity should be capable of carrying out this test - it's also something that can be done as part of a group session where everyone can help each other with the timing and counting. What do I need? Apart from the obvious, a pool to swim in - size doesn't matter although 25m or 50m is best - you need some basic equipment: a stop watch to time the swim, someone to act as a lap counter and a calculator.

Test criteria The test needs to be carried out in the same way each time so there are some basic criteria: Must be from a push start; no diving is permitted The swimmer must be allowed to fully recover from each swim Record the time for each swim in seconds and calculate by the method shown below The test itself comprises two swims over 400m each and two swims over 50m each.

The best method to do this is to swim a 400m, rest and then swim a 50m. Now rest and repeat the two swims. You will now have two sets of data for the following calculation. D1 is 50m, D2 is 400m, T1 is the time for 50m recorded in seconds and T2 is the time for 400m recorded in seconds. The formula for the calculation is this: CSS = (D2 - D1) ÷ (T2 - T1) To give an example; Flipper swims 50m in 35 seconds and 400m in 297 seconds so: CSS = (400-50) / (297-31) CSS = 350/262 CSS = 1.32 metres/second What now? Remember the results of the test can only be compared to previous CSS tests. With the correct conditioning, training and stroke technique between the tests, you will be able to see how your training is leading to an improvement in your aerobic capacity or, on the other hand, it could highlight failings in your training regime.

After collating and analysing the test results, how can we incorporate the results into our training schedule? Well that’s the easy part. We can use the results to determine our training times.
For example, Bob's training plan requires him to swim 6 x 400m, so the time it should take him can be calculated as follows: 400m training time = distance/CSS Bob has a CSS of 1.35 meters per second so the calculation is as follows: 400/1.35 = 296.3 seconds = 4 minutes 56.3 seconds for each 400m swim

Does it work? While the reliability of the test results depend on the test criteria and commitment of the athlete, the CSS test itself has proven to be a valid and reliable measure of a swimmer's aerobic capacity. Ut has been rigorously tested by its inventor, who determined that the CSS for a swimmer was about 80 to 85% of maximum 100m swim speed and 90 to 95% of their 400m swim speed. This test will enable you to improve your aerobic fitness and incorporate the results into your training programme.

Remember, tests should always be conducted under conditions as close as possible to the previous test and over-testing can give poor results. Every six weeks is enough to test whether your programme and training is progressing or not. References Ginn, E. (1993), The application of the critical power test to swimming and swim training programmes, National Sports Research Centre Ginn, E. (1993), Critical speed and training intensities for swimming, Australian Sports Commission

Tuesday, 8 January 2013

kettlebell training for triathletes part 1


I am often asked by triathlete’s and duathlete’s alike, as to what is the best kind of weight training to compliment the disciplines of their endurance sport. Coaches and trainers will give you different answers, and scientific proof that one way is better than the other. Some do not advocate strength training at all, so there is no easy answer to this as many ways have been tried and tested and all coaches have a preferred method of strength and conditioning. Owing to the nature of triathlon predominantly slow muscle twitch fibres are used, with some training incorporating fast muscle twitch fibres.

To be honest both should be used and are utilized in training and competing. Bodyweight is very advantages to endurance athletes as it builds, strength, flexibility, mobility, endurance and allows the athlete to maintain an athletic look rather than a bulked up look. Most athletes are told to follow more traditional methods of weight training where the body works as individual units to strengthen the muscles, much the same as a body builder or power lifter.

A lot of time is spent on clean and jerks, snatches, hang cleans, all great if you have time to perfect the technique, access to the proper equipment and really want to compete in weight or power lifting events. Many of the programmes given to athletes are specific to one discipline with a little crossover in some areas if the coach understands the physiology and body requirements of the sport. Having coached athletes both for general preparedness and sport specificity, one thing I have noticed is a lack of posterior strength in many triathletes, mainly owing to poor training programmes or lack of knowledge concerning the anatomy of the body and the requirements of the sport.

This is where I believe and have proved it to my athletes that kettlebell training will aid and compliment there existing training. Firstly lets look at the anatomical position in order to correct the PKC (posterior kinetic chain) Anatomical Position What is the anatomical position? The anatomical position is a position used as a reference when describing parts of the body in relation to each other. Used in conjunction with terms of relationship, terms of comparison and terms of movement, the anatomical position allows a standard way of documenting where one part of the body is in relation to another, regardless of whether the body is standing, lying down, or in any other position.

A person in the anatomical position is standing erect with the head, eyes and toes pointing forward, feet together with arms by the side. The palms of the hands are also pointing forward. (see below) When looking at an individual it is important to understand the basics of Optimal Posture/Alignment.

Basically a line or plumb line can be held against the side view of the individual and the poinths that should line up starting from the bottom are Ankle–neutral, planter or dorsiflex position. LOG (Line of Gravity) slightly forward of the lateral malleolus of the ankle Knee-full extension LOG falls anterior to the knee but just posterior of the patella Hip and Pelvis- both in neutral the posterior superior Iliac spines should be below 10 degrees for male and 15 for female Spine should curve naturally and be neutral The LOG falls slightly posterior of the cervical spine Shoulders- Scapula retracted and depressed Head- Ear LOG should fall through the centre of the ear. The optimal posture/alignment may not be correct in most individuals; this is owing to genetics, activity, injury, inactivity. By ensuring we check and compare our alignments we can ensure what corrective work may be required to correct our alignment.

Now for the posterior kinetic chain which in basic form propels you forward! And is used in all three disciplines. This is a collection of muscles that are responsible for lower back stability and hip extension. These muscle groups are possibly the weakest in most humans in today’s society, resulting in poorer physiques owing to lower and upper back problems which develop owing to the fact most of the workforce today are in seated positions most of the day. Muscles that make up the posterior chain include Erector spinae Gluteus maximus Hamstrings Bicep femoris Semitendonosis Semimembranosus

To understand the PKC fully we need to also look Elastic Potential Energy (EPE) Definition of EPE Elastic Potential Energy called “EPE” is a measure of the restoring force when an object changes its shape. EPE is similar to GPE (Gravitational Potential Energy) except that the restoring force depends on the substance of the material and not due to gravity. The force which returns the spring to its original shape is called the restoring force. The size of the restoring force depends on the stiffness of the spring and the amount it has been stretched. The more stiff the spring and the further it has been stretched, the more EPE it has gained.

Anything elastic will gain EPE when its shape is forced to change. Other examples are.

1. A catapult pulled back to launch a stone.
2. A crossbow primed to fire an arrow.

When the shape is restored, EPE is transferred to Kinetic Energy (+ Heat) In western society for many centuries we have been great abdicators of the squat, ensuring we never bypass our knee line with our buttocks, this is in part owing to our way of life, most item’s we have which we can sit on is at right angles to the ground, e.g chairs, toilets, car seats, benches. We have lost the ability to use our hamstrings properly and engage them in sport or daily lives, hence the reason most sport or fitness related injuries are the hamstrings.

What do we mean by elastic potential, quick examples would be Olympic power lifters and the depth they go to for power squats and lifts, Asian communities where if you observe them at a local roadside café they are all hunkered down with there bottoms close to the ground feet flat leaning slightly forward. As they get up as do power lifters they explode ensuring the hips, glutes, back, hamstrings and quads all fire nearly in unison so as to drive them up to a standing position. Using the above example and a liking the hamstring to a spring; if we stretch a spring and then let go, it will return to its original shape (provided it has not been stretched beyond its elastic limit).

This is why we need to improve elasticity in the hamstrings to prevent injury and to release EPE within the muscle group. Types of Contraction and Elastic Potential Isometric Isometric exercise or “isometrics” are a type of strength training in which the joint angle and muscle length do not change during contraction (compared to concentric or eccentric contractions, called dynamic/isotonic movements). Isometrics are done in static positions, rather than being dynamic through a range of motion. The joint and muscle are either worked against an immovable force (overcoming isometric) or are held in a static position while opposed by resistance (yielding isometric). Concentric Muscle fiber generates tension through the action of actin and myosin cross-bridge cycling. While under tension, the muscle may lengthen, shorten or remain the same.

Though the term ‘contraction’ implies shortening, when referring to the muscular system it means muscle fibers generating tension with the help of motor neurons (the terms twitch tension, twitch force and fiber contraction are also used). Eccentric Muscle fiber generates tension through the action of actin and myosin cross-bridge cycling. While under tension, the muscle may lengthen, shorten or remain the same. …

The tensioning of a muscle as it is being lengthened Contraction of a muscle, involving lengthening of the muscle as in lowering a weight to the ground; a muscle contraction, in which the contracted muscle lengthens. Integration of the Kettlebell Kettlebell training is not new it is not magic, although some may have you believe it. The Russians who are at the front of kettlebell sport have used tried and tested techniques for years. Since the collapse of the cold war, this amazing little weight has once again exploded onto the fitness scene.

The major benefit that you will experience once you start training with kettlebells is the fact your whole body works in unison. You will feel the burn in your hamstrings, glutes, quads, back, shoulders and arms and that’s just from the basic techniques such as the KB swing. Even bodybuilders have come to appreciate and understand the need to train with kettlebells and add them into there training regimes, no longer do they work muscle groups in isolation of each other.

What does this mean for you the individual and what does KB training do for you

• Teaches your body how to work as a single unit (it integrates the whole body together)
• Allows for high repetition work which is phenomenal for fat loss conditioning
• Emphasizes the use of the glutes, hamstrings, spinal muscles and abdominal muscles for maximum power and speed enhancement.
• Simultaneously improves both strength and cardiovascular endurance (known as incidental cardio)
• Improves flexibility (this happens as a by product of training)
• Boosts your metabolism thus burning more fat
• Develops incredible hand, grip and finger strength • Improves full body stability and balance due the dynamic nature of the exercises
• Burns more energy because of the full body integration If used correctly and it is worth attending a reputable workshop with a qualified instructor, which will ensure that you understand the basic mechanics and swings of Kettlebells and start to incorporate them into your training programme you will see and feel a difference

So get swinging!

From Drowning to Swimming!!


Eighteen months ago I decided to undertake my first triathlon to raise money for 500 miles, a charity which raises money for the supply of prosthetics and orthotics for people in Kenya and Mali who have missing or deformed limbs. I wanted a challenge to encourage lots of sponsorship and thought this would be one, especially since at the time I couldn’t make it through 750m of swimming with any stroke!! My first triathlon was Stirling Try-a-Tri Sprint distance in June 2009.

I worked hard for several months making sure I could make 750m breaststroke to at least complete the swim. However, I knew this was not really the best way to complete the swim for my overall tri performance. At the same time I have been trying to learn to swim front crawl. My first attempts were interesting, to say the least. Having had the usual school tuition for training – get in the water and get to the other side of the pool without swallowing all of it – I didn’t really have much idea of what I was supposed to be doing. As a consequence I tended to avoid swimming crawl as it involved an awful lot of splashing, not much forward movement and an ever present danger of a lifeguard jumping in to rescue me!!

In fact I was so bad that when a friend tried to teach me to swim her first suggestion was that I use a float and kick for a pool length. The result was that I went backwards, then couldn’t swim for laughing. So, I obviously needed help. This came first from Andrea, a colleague and friend who as an open water swimmer who has swum the English Channel knows lots about swimming technique.

She very patiently watched my efforts, gave me great advice and spent time helping me get a reasonable technique. Then I joined the TOD team, and one of the huge benefits has been regular training sessions in the pool.

For the first session I almost turned up with a rubber ring and arm bands, but wasn’t sure that wouldn’t get me into more trouble than I was already in. When Brian asked me to swim a length of crawl it was the last thing I wanted to do as I knew my technique was still very iffy, but I knew it had to be done. He was very kind (well, he didn’t laugh) and from that first session has given me great advice and tips. In addition, he gave me a couple of tough swim sessions to do regularly.

When I first saw them and realised the sessions were 80 and 100 lengths I nearly died. The warm up session of 30 lengths was about my total swim distance at the time, but swimming the longer distance regularly has really helped my swim fitness.

My main goal has been to swim the full sprint race distance front crawl without stopping. It has taken me some time to get my breathing together and relax enough in the pool to string a number of lengths together, but a couple of weeks back I managed two sets of 10 lengths in my local 20m pool.
Then it all seemed to come together, I did twenty lengths in one go last week, then yesterday for the first time I completed forty lengths without stopping.

That last length was amazing, it was a bit tricky to swim with a broad grin on my face and the guy in the Jacuzzi did wonder why the lone swimmer was whooping at the end of the length, but the feeling of finally getting the rhythm and having the strength to get the distance is amazing. At 800m this is slightly over the sprint race distance, and at over 23mins it is 4mins slower than my breaststroke time, but I know it will get quicker.

I can now call myself a swimmer at last!!

Denise