Friday 17 May 2013

Strength and conditioning for triathlon 1


Exercise selection

When it comes to strength and conditioning for triathlon it is simple to fall into the old body building programmes which is how most sports fell into developing their own programmes and protocols

The demands of the sport are vast and too time consuming to go into each particular bio mechanical demand, stress and requirement of each muscle group, however once you understand the basic requirements of the muscles, exercise prescription and selection should be easy for you.

Firstly we will start from the ground up and look at exercises to increase overall strength in each of the disciplines.
In this article we will look at two types of squat although all squats have unique coaching points to each of them, the basic fundamentals in general are the same

> each squat movement should be initiated with the hips sitting backwards (imagine sitting in a chair) your knees will bend automatically, your back should be kept tight with the abdominals in a braced position, the back must not be allowed to round off at any point, if your lower back rounds a few factors need to be looked at the first and main two are technique and the weight lifted.

> knees must be stable (the knee is a stabilising joint (so allow it to do its job) the knees should not be falling inwards they should follow the line of your toes.

> the descent must be controlled with a slight pause or hold on completion of the downward movement, this allows for a more powerful drive after the initial inertia has stopped. Never bounce out of the squat!

> Your weight must be evenly distributed throughout the exercise your feet should be about shoulder width apart

Exercise 1 Front Squat

The front squat is probably the second least used squat after the overhead owing to a greater degree of difficulty compared with the back squat, the front squat also allows for a bit of variety in your session.

As stated this squat is technical and the biggest obstacle for many people is holding the bar in the correct position.
The bar can be held in the crossed arm position (fig 1) or the clean position (fig 2)

Cross arm position


Flex the elbows and cross your forearms in front of your chest Position the bar evenly on top of the anterior deltoid without use of your hands Place your hands on top of the bar using the fingers (hand open palm down) to keep it in position.
Move the arms upwards so they are parallel to the floor.

Clean position


many struggle with this position owing to a combination of lat and wrist tightness.

Grab the bar with an even closed pronated grip ensuring the hands are just over shoulder width apart Rotate the bar so it rests on the anterior deltoids or clavicles, the hands should be just out with the shoulders with the back of the hands resting on the deltoid or clavicle.

We advocate position 2 as this will be of greater assistance later in the programmes when completing the Clean and Press

Exercise 2


Back Squat
The most commonly used squat and one that probably promotes more incorrect technique than correct technique, mainly owing to the use of a Sissy pad.

Sissy pads promote in correct technique by allowing users to rest the bar using the pad on their shoulders thus promoting incorrect technique by not allowing the user to retract the shoulders making the chest bigger and allowing the back to naturally produce a bed of muscle for the bar to sit on comfortably. if the pad is used it can promote bad posture issues and a loose upper back.

The back squat has two placement positions which is personal to the user dependant on any factors however both are correct and both can be used. All users should regularly attempt to to use both positions in their programme.

Low back position


Grasp the bar and place it across the shoulders in the middle of the trapezius and across the posterior deltoids ensuring the bar is in an even position ensure the grip is closed and pronated and outside shoulder width apart

High Back position


Grasp the bar and place it above the posterior deltoids just below the neck closed pronated grip with hands outside shoulder width apart.

NB for both of the positions the elbows should be raised to promote a shelf with the upper back and shoulders this prevents the bar from slipping.

Strength and conditioning for swimmers 1


Prehabilitation exercise for the shoulders

Prehab is sometimes scoffed at by athletes of various sports, however it is becoming a major and integral part of many an athletes strength programme.

Physiotherapists and sports masseurs have been using pre habilitation to ensure that athletes stay at the top of their game and obviously to minimise the risk of injury and then having to enforce rehabilitation as part of the plan.

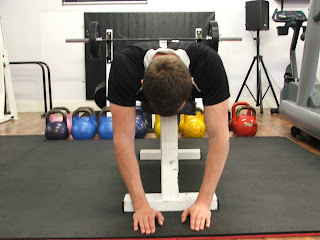
One of the best shoulder rehab exercises for swimmers or even upper body athletes is shapes, quite simply the shoulder's make the relevant alphabetical shape during a four movement functional movement pattern. This session can be used as a warm up, part of a conditioning set or on a stretching routine where functional movement patterns form part of the stretching. The following movement pattern may help to improve fine motor skills used during swimming.

Start position - lying face down on a bench or step, ensure your chest down to the top of your knee is supported by he bench, hands hanging down to the front of the bench shoulders relaxed (fig 1)


Execute the following movement pattern ensuring that

Start at the start position for each phase All movement is controlled Perfect technique is conducted throughout the routine for each movement pattern If fatigue sets in do fewer reps

Y (fig 2)


T (fig 3)


M (fig 4)


L (fig 5)


Coaching points

Don't cheat by throwing the arms out
Or moving the chest off the bench
Shrugging the shoulders up towards the ears


Exercise prescription
Start with body weight and progress to light dumb bells no more than 2kg
For best results ensure you start the movement patterns at a different point each time you conduct the sequence, this ensure stat the muscles fatigues at different points.
Vary the sequence as well as in
First time execute one of each movement until required reps sets complete
Next time do only the t's first then the y's and so on.
Also repeat the pattern in reverse.

Variation
Try the movement patterns whilst seated on the edge of a bench ensure the spine is upright and stable.

Watch out for more conditioning drills from T.O.D Coaching.


Thursday 9 May 2013

Aberfeldy cycle update


What goes up, must come down!

My main target for this year is the Aberfeldy Middle Distance Triathlon which consists of 1900m swim in Loch Tay, 56 miles cycle ride and a half marathon (13.1miles) to round it off. All my training this year is aimed at getting me round this course so when I realised the cycle route involved a climb over the saddle of Schiehallion and back again I thought it would be good to check out the bike ride ahead of time.


Last weekend I headed up to Kenmore, along with my very understanding and supportive husband, Jerry. Since it had been my birthday the week before we went up for the full weekend to stay at Kenmore Hotel as a treat, and had a very enjoyable Friday evening. On Saturday we took a look at where the swim goes from but any thoughts of a trial swim were very quickly dispelled by both the water temperature and the howling wind whipping across Loch Tay. I would certainly not go into water like that without a very strong swimmer by my side, at the very least.


We then decided to drive the route so I would know where I was going on Sunday, when Ian from work was coming up to cycle the route with me. Jerry would be our support crew, meeting us in a couple of places with require refreshments and moral support.
On driving out of Kenmore it was pretty quickly apparent that the hill had not been exaggerated, a 1000ft climb in one long drag which seemed to go on forever in the car. Once at the Schiehallion turning the road then undulates, before dropping down the other side into Kinloch Rannoch. The route goes around the north side of the loch back along the south side and then back over the hill to Aberfeldy.

On the return drive it was clear that although the climb is not as high as the first one it is steeper. We saw plenty of cyclists all along the route, as it was the Etape the next weekend we may have seen some people giving it a last minute trial.
I finished the drive a bit worried for the next day, but I had always planned to do it to give myself an idea of the route, compare the hills to ones I was training on and get a feel for how far off ready I was and not worry about how fast I did it. My goal for the race is to cycle it in less than 4 hours, and for the recce I was expecting to complete the route in 5-6 hours.


Sunday dawned reasonably bright with a stiff wind, not as bad as the previous day but still pretty windy. Also the forecast was for rain from midday. Ian arrived just after nine and we headed out straight away. There is a three mile flat road before the hill starts so the legs get some warm up and then the climb starts. I knew it would be quite tough so decided to just pace myself and make sure I could do it in one go. Ian very kindly stayed with me to keep me going and by just thinking about keeping the rhythm and drawing on my training I made it to the top and turned onto the saddle still feeling pretty strong.

The saddle was good after the hill but the wind was swirling about and after the fast drop off the top we were into a head wind all the way into Kinloch Rannoch. We had planned to meet Jerry at a parking spot at the head of Loch Rannoch, I thought it would take us at least 90 mins to get there. In the end we did the 16 miles in 1 hr 13mins so were too early!

We waited ten minutes but the spot was a cold one so after a protein flapjack we headed out. We had to stop after ten minutes when Jerry called to make sure we were OK, and on getting going again I was struggling to get my second cleat to connect. While still trying to do this I lost attention on the road, ran off the side into a huge rut and next thing I knew I was in the middle of the road. I hate falling off, I always feel so stupid. Since nothing seemed badly damaged, my right elbow and hip were just sore I got back on and kept going.

The headwind all along Loch Rannoch was very tough and seemed to go on forever. I was desperate for the turning at the bottom of the loch. It came at last and then we turned and had the wind at our backs, but the south side is more sheltered so there did not seem to be as much benefit as we had difficulty. The route around the loch is mainly undulating with a couple of tricky hills but generally OK. We met Jerry at a car park and stopped for lunch.

It was a relief to get out of the wind and sit in the car for a few minutes. When a few spots of rain started we decided it was time to get going on the last leg. I was very aware that we had a steep hill ahead of us and tried not to worry about it too much. The first few miles were along the loch side and were undulating again, then there was a flat few miles with a nice tailwind before the climb began. It is not as high as the one on the way out at 600 feet but it is very steep and I had to really pace myself to keep going.

The hill does have a respite about half way up where there is a flattish bit then it starts again, with a pretty nasty hairpin and just an unrelenting climb. Again, I managed it without having to stop and the top was definitely a relief. At this point though the rain came in with a vengeance and that swirly wind became a real headwind. The whole ride along the saddle was much harder than the way out, and seemed to go on for ages. I was very relieved to see the T junction at the top of the hill and, even better, the rain stopped at the same time.


The ride down the hill was fabulous, but seemed to be very long. I was very impressed with myself that I had been able to cycle up it in one go! Also, a van behind us decided not to bother passing us as we were making such a good pace. I only slowed for a couple of the tightest bends. The last three miles was a flat ride back to Kenmore (we decided this was better than going to Aberfeldy and needing to come back along the main road and only takes off 2 miles) but the headwind again made this harder than I wanted. It was great to see the Kenmore Hotel come into view!


Overall we took us 4hrs 30mins, actual riding time was 3hrs 41mins and I felt pretty good at the end. The route is tough but I did it in much faster time than I had thought I would, both overall time and actual riding time so I now have loads of confidence that my training is going well and I will be able to do the ride on the day. The idea of checking out the route was a great one, so I am really happy we did it. Roll on August and huge thanks to Ian for keeping with me!!

Friday 3 May 2013

Battle Ropes


Battle Ropes for triathletes
I know sounds weird why would an endurance athlete who spends most of their time swimming, biking and running even consider a new approach.
I shall tell thee!
Firstly what are battling ropes?
This type of training is not new but has seen a new introduction and thought process over the past ten years with it re starting in America.

The ropes come in various sizes, predominantly 25mm and 45mm with lengths of 5m, 10m and 25m and weigh 7.5 and 20 kg.
Benefits of battle rope training include
The benefits of training with the ropes is that it is just isn’t a conditioning tool, this piece of equipment will work every muscle you have including some you didn’t know about.
One of the big benefits is the development or enhancement of power endurance It is essentially the ability to apply maximal force, at maximal speed, for a maximal amount of time. This requires a huge demand on the energy systems in the body, burning a huge amount of calories and improving strength and fitness.

 Power endurance – the ropes increase all over power by working the whole body as a unit

 Low impact Minimal stress is placed on the joints, with all the force applied through the muscular system.

 Athletic Performance. Trains the neuromuscular system to apply force that begins at the core and extends through the extremities (both arms and legs) - a must for improving performance.

 Calorie Burner. Burns just as many calories as sprinting, high-intensity interval training and heavy resistance training

 Killer core workout. Works the core not just the abs, remember the core goes from hip to shoulder diagonally across the body front and back and down to your knees front and back thus it ensures that by both applying power from the core and stabilizing and bracing spinal movement.

 Builds functional strength. The body is worked as an integrated unit rather than in isolation.

 Psychological training. This will push your boundaries because it burns as soon as you start and you need to push through the burning to reap the benefits.

 Easy to use from novice to elite levels and once you can’t hold them anymore just drop and go!


Using the ropes
Ensure the rope is wrapped around an anchor point, and you hold it at the very end of the rope's length. Then using a whipping or circular motion with your arms, you create what's called a “wave”, which requires a huge metabolic demand to maintain in the rope.
There are four basic exercises which are commonly used and are standardized throughout the world.

The Wave- create continuous waves as a double or alternate wave

The Pull- by copying the action of a skier you pull the rope towards and the side of you, again to one side or alternate.

The Slam – basically like a wave but slam the rope downwards to the floor every time you lift.

Jumping jack- the same as a bodyweight jumping jack but use the ropes.

These exercises are great for athletes of all sports; however we have developed a few to further the development and power of triathletes especially for the swim.

Corkscrews- similar to a wave but ensure the rope rotates in a continuous manner in a circular motion, both can be done as one rope, singles or alternates and ensure you go the opposite direction.

Hi-lo’s- you need a bosu for this as well or a mat, Slam in the standing position then drop on to the bosu and conduct another slam.
Front crawl- lie on a bench face down with the ropes in each hand and execute alternate waves with straight arms and kick your legs at the same time as if swimming front crawl.

Back crawl- lie on a bench on your back with the ropes in each hand and start alternating the ropes in a wave like motion kicking your legs.

Butterfly- lie on a bench face down and execute corkscrew motions with the rope change direction each set. Legs moving in a dolphin kick motion.

The best use for the above is a metabolic session so we employ a 30 second work rate followed by 15 seconds rest, repeat for five minutes rest 1 minute and move to the next exercise or repeat the same one.

Get them ropes moving!

Kettlebells for triathletes part 2


Hope fully by now you will have read and digested some of part 1 and why kettlebell training should be an integral part of your strength and conditioning for endurance events.
In part 2 we will cover selection of a kettlebell and weight, and cover further exercises which will aid you in your strength training.

Kettlebell selection
When choosing a KB it comes down to an individual’s choice and much has been written covering this subject.
The KB should fit comfortably in the hand and easy to grip, with the handle being smooth, the horns rounded not angular and the distance from the bell to the handle around 6cm’s.
I personally use KB’s provided by optimal life fitness or Jordan’s as these fit the above criteria and are averagely priced. Whether you want cast iron, solid, rubber, vinyl dipped is entirely your choice.
Weight wise it is widely recognised that female’s starting out should use between an 8kg – 12kg KB and med 16kg-20kg KB. Again this is down to experience with KB’s and current fitness levels.

The main point to remember is that the KB will work your body as an entire unit and not isolate muscle groups (unless used for this purpose) so starting with the above suggested weights until the technique is mastered is sound advice. Please don’t purchase any of the so called fitness belles which range from about 2.5kg to 7kg as you will quickly find that these are of no use to you in any capacity apart from a doorstop.
Conventional exercises
These can be used as part of your training and are widely used by athletes with Kb’s.

The basic’s are
Tricep extension
Bicep curl
One arm row
And are utilised the same way as a normal dumbbell, beware though that the KB does hang as dead weight and is harder to control compared to a balanced Dumbbell. We will add some more isolation exercises later.

The swing
Once you have mastered the basic Kb techniques, you can look to progress onto other exercises; one thing that I as a coach and KB user advocate is the turn method of swinging.
Many people use the standard version (American) which places a lot of pressure onto the front deltoid and users/athletes tend to try and lift rather than swing the KB.
The thumb method basically is turning your thumb to the rear (thumb to bum) as the Kb swings through your legs. This method allows for better control and utilises the rotator cuff muscles, triceps and deltoids to be incorporated more and ensures that the athlete “snaps out” from the hips utilising the PKC (posterior kinetic chain) and ensures the bell swings rather than being lifted.
Most Kb movements start from the swing and can be completed using one or two Kb’s below is some of the basic exercises.

Fundamentals.
1. Double handed swing
2. Single hand swing
3. Alternate hand swing
4. The clean (rack)
5. The High Pull
6. The swing snatch
7. Military Press
8. See Saws.
9. Front Squat
10. Conventional dead lift

These exercises must be practiced and perfected before moving onto additional exercises, I have tried to include what I feel are the better versions for triathletes, and have tried many and varied versions with Team T.O.D over the past year.

Progression
1. Arrowhead swing (double swing to overheard)
2. Saxon side bends
3. Diagonal snatch
4. Reaching Lunge (front, side, rear)
5. Stair Squat
6. One arm Scot’s press (squat press)
7. Windmill
8. Turkish get up (lunge style)
9. Split jerk
10. Push Press
The above list is not exhaustive either are the different types or amounts of KB exercises out there,
However the above and the exercises listed in this blog are as I said what I as a coach and triathletes from Team T.O.D who have used the KB’s as an integral part of there training consider to be the better ones.
If there are any out there we have missed or are considered to be better than those listed please let me know and I will try them out.
Conventional exercises have briefly been covered but we will add some more to the list which can be beneficial to your strength programme and should e incorporate as part of it and not used as stand alone exercises.

1. Bench press
2. Calf raise
3. Thumbs up press up
4. The Fly
5. Straight arm pull over
6. Bent arm pull over
7. Front arm raise
8. Jowett tricep kickback
9. Side press
10. Bent press

When it comes down to sets and reps for any of the exercises listed, this again is down to specifics and what the outcome of your session is to be.
Predominantly we as a team tended to opt for between 12-15 reps of a set, and also conducted timed circuits of 5 minutes with 30 seconds of an exercise and fifteen seconds rest, completing as many reps as possible in that time for each exercise, this also lends the body to metabolic conditioning which is a another subject in its entirety.

Upping the ante!!


Upping the ante!!

If I thought the Jan training plan was hard that was nothing compared to February’s! When I got the plan I realised the swim was really getting long now – 3km each time, and Brian had included a 30mile bike ride each week and one of the ten mile runs had a wee surprise – hill reps up Ratho Hill! Still, I know it is what I need to do to be ready for the half Ironman distance.
The first week went really well, did it all and managed it, even if it was not pretty at times. The first time I ran up Ratho Hill I thought there was no way I would do this four times, but I gritted my teeth, dug in and managed it, although the final cool down mile was a grind. The swim sets also took a bit of getting used to, but they now seem like a normal swim, it is amazing what you can get used to.
Although I have been training hard and done almost everything on the plan I have struggled with a few things. I have been travelling for work every week in Feb so this made things a bit tricky, and a lot of sessions were done in gyms rather than outside. Also, I was fighting off a cold until ten days ago when I really went down with it so that put a whole weekend out for training. At least it coincided with snow so I did not lose out twice! The hardest bit has been to do the 30mile bike ride. One was done in the gym – I have now found something more boring than treadmill running! Last weekend I was able to get outside on the bike and it was fantastic to be out. I am so looking forward to the better weather and lighter nights.
I have a bit more travel coming up but am then hoping that things will become a little more reasonable and I can get my life back.
Most weeks have been 10-11 hours training and it has been tough to squeeze it in, but then again when travelling there is little else to do in the evenings so a gym session can be a good way to fill time and stop myself eating too much and spending the evening in the bar!
For interest, my distances to date are:

Jan: Ran 82.5 miles; Cycled 160 miles; Swam 8.9 miles
Feb: Ran 75 miles; Cycled 101 miles; Swam 13.6 miles

Roll on March!!